In my never-ending (and often misguided) quest to bridge the world of writing and programming, I decided to take a crucial tool from the software world and use it to manage my documents. The result: a powerful (if convoluted) system for drafting and revising documents.
The best way to approach this topic is with an example. Let’s say you’re working on the next great American novel. You’ve already hammered out two paragraphs and you’re feeling pretty confident. You decide to take a break for a few days, and when you come back you realize you’re not really sure you like the direction that the story’s going in. Actually, if you go back and rewrite a few lines, you can really spice this up! You create two new copies – one for each chapter – and begin working on those. But halfway through those, you get another great idea and stop what you’re doing to create two more copies. Before you know it, your two-paragraph novel is scattered all over the place and cluttering up your hard drive. Even worse, you can’t remember which copy corresponds to which idea, which copies go together to create a comprehensive story, or even which order you created them in.

As a developer, one of the tools I’ve grown to love more than anything else is a version control system called Git. A Version Control System (VCS) is a system for tracking and maintaining changes to files. Their primary purpose is for sharing code files among groups of developers, but they can be used for anything from Word documents to multimedia. A key benefit of a VCS is that it creates a history of modifications to each and every file that it manages, allowing you to see what changes were made and when those changes were made, restore older versions, facilitate collaborate editing, and even maintain multiple different sets of changes to the same file.
You’ve probably been exposed to some form of version control without even realizing it. Almost all modern file sharing, backup, and collaborative editing apps implement some sort of version control solution. Dropbox, for instance, lets you restore older versions of a file simply by clicking on a file and the date that you want to restore from.
Don’t be a Git
Git is one of the most popular modern version control systems out there, and the focus of this post. There are other tools out there such as Subversion (SVN), Mercurial, and Team Foundation Server (TFS), but the benefit to Git is that it’s popular, has tons of documentation, and it’s free.
At first glance Git can be pretty daunting, but it can become a powerful tool if you take the time to understand what’s going on. We’ll start by covering the basic concepts and move into actual usage later in the post.
Note: This article focuses on using the command line (CLI) to interact with Git. A graphical (GUI) client may be easier to start with if that’s what you’re used to. There are multiple different Git clients available for Windows, Mac, and Linux.
The Basics
It all starts with a repository, or repo. A repo is a folder where Git stores information about the files it’s tracking, as well as the files themselves. Repos can be stored on your local computer or on a remote server. There are even websites that host Git repos for free. To create a repo, navigate to the folder where you want to track files and type:
$ git init
Initialized empty Git repository in ~/My Great American Novel/.git/
This creates a Git repo inside of the existing folder. What this means is that Git will now monitor the folder for changes and allow you to perform actions based on those changes. But first, you’ll want to tell Git which files should be monitored and which ones should not. This is important in case you want to prevent certain files in the folder – such as files containing private information – from being tracked.
Use the git add command followed by a list of file names to track a file in Git. For example, the following command tells Git to add the files Chapter 1 and Chapter 2 to the repo:
$ git add "Chapter 1" "Chapter 2"
This places both files into what is called a staging area. The staging area is where you queue actions – such as adding or removing files – before applying them to the repo. To use Dropbox as an example: Dropbox handles version control by creating a new version of a file whenever you save it. With Git, it’s a bit different: you determine when a new version is created and what changes that version contains. Git is less about managing files and more about managing changes: you specify what changes make up a new version, whereas tools like Dropbox automatically determine it for you.
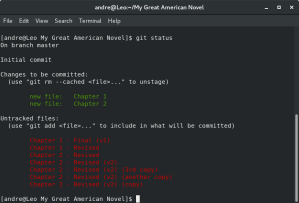
The staging area lets you preview the new versions of your files before setting them in stone. This may seem like a superfluous step for just two documents, but it becomes incredibly important when you start combining multiple different changes or resolving conflicting changes. You can look at the status of the staging area by using the command:
$ git status

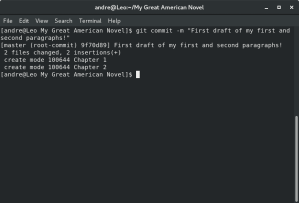
Staged actions are listed under “Changes to be committed”, whereas untracked changes are listed under “Untracked changes”. When you are ready to permanently apply your changes to the repo, you do what’s known as a commit. A commit saves your changes as a new version. It’s essentially a snapshot of your repo as according to the changes you set up in the staging area. Your files stay exactly as they are right now, but now you have a permanent copy of them as they were at this moment in time. Later on, if you choose to restore this commit, your files will revert back to the way they were at the time of the commit.
When you run the commit command, Git asks you to summarize the impact of this change in the form of a message. Try and enter something meaningful: commit messages are incredibly useful when browsing through the repo’s history.
git commit -m "First draft of my first and second paragraphs!"

Commits not only record changes to the file, but they also record the time of the change and the person who made the change. This may not be a concern when it’s just you, but it provides accountability when sharing a repo with multiple other people.
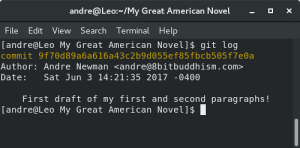
Git also stores a log of changes to your repo. To view it, simply run the command:
$ git log

There’s not much to see since we only have one commit, but the information available is still very useful.
Finally, the checkout command lets you roll your repo back to an older commit. You may have noticed when running git log that there’s a long string of letters and numbers at the top of each commit. This is the commit ID, and it’s what you’ll pass to git checkout to revert to an older version.
It’s important to note that checkout does not change your repo’s history, but rather it essentially reverts your files to their state at the time of the commit. It will even add or remove files that were added or removed after the commit.
$ git checkout <commit ID>
Branching Out
You may have noticed the words branch and master displayed in the output of some of these commands (such as git status). Each time you make a commit, you’re making a single point in a linear history of events. One commit follows another in a straight line. A branch is a deviation from that linear history, allowing you to work on another history independently of the original.
Let’s say you start revising chapter 1, and halfway through you get an idea that’s way better than the idea you were developing. But you don’t want to lost what you’ve already written, and you don’t want to create a new file or add another section to the current file. So what do you do?
With Git, you can commit your current changes to the main branch, then create a second branch where your revisions will take place. Picture it as creating two separate timelines: there’s the original timeline where chapter 2 is your original idea, and there’s a new timeline where chapter 2 is your cool new idea. You can jump back and forth between these two timelines as if they were two different repositories, and you can commit to one without changing the other. You can consolidate your changes by merging one branch into the other, but that’s a topic worthy of its own post.
I often find myself rewriting sections before I finish them, and while I’m trying to curb the habit, I found branching is a great way to create and manage different drafts without cluttering my computer.
Where Do I Go From Here?
While version control systems aren’t as seamless or invisible as Dropbox, OneDrive, or iCloud, they do offer a much larger degree of flexibility. The only way to know if it will work for you is to try it. Create a test repository and copy some empty files into it. You might find that Git (or any VCS) is too clunky or cumbersome for what you’re trying to accomplish, and that’s fine. Git’s just another tool, and like any tool it won’t always fit everyone’s needs. But if you’re like me and you like being able to see each stage of your projects from start to finish, you may find it to be incredibly useful.
The following links are great starting points for learning Git:
Try Git (Interactive tutorial)
2 thoughts on “Managing Your Writing with Version Control Software”